# Canvas 2D, Web GL 3D
The HTML Canvas API gives the developer a way to draw graphics using JavaScript inside an HTML
<canvas>element
HTML Canvas API 为开发者提供了一种在 HTML<canvas>元素中使用 JavaScript 绘制图形的方法The Canvas API is primarily a 2D graphics API
Canvas API 主要是一个 2D 图形 API- Useful for animations, games, data visualization, video and photo processing, and more
适用于动画,游戏,数据可视化,视频和照片处理等
- Useful for animations, games, data visualization, video and photo processing, and more
The WebGL API is used to draw 2D and 3D graphics using hardware-acceleration but still uses the HTML
<canvas>element
WebGL API 用于使用硬件加速绘制 2d 和 3d 图形,但仍然使用 HTML<canvas>元素- API is similar to OpenGL ES 2.0
These are all APIs used for drawing on a
<canvas>element on the page using JavaScript
这些都是使用 JavaScript,在页面上的<canvas>元素上绘制的 APICanvas is a raster-based where the canvas objects are drawn in immediate mode.
Canvas 是基于光栅的,其中画布对象以即时模式绘制。
Once the item is drawn to the canvas it is forgotten.
一旦项目被绘制到画布上,它就会被遗忘。
If you are doing animation you redraw the entire scene each frame.
如果你在做动画,你每帧重绘整个场景。
You can not modify something once it has been drawn to the canvas.
一旦绘制到画布上,就不能对其进行修改。This is different than svg which is vector-based and the shapes are remembered as objects in the DOM and then rendered to a bitmap on the screen when the HTML renders.
这与基于矢量的 svg 不同,形状被记住为 DOM 中的对象,然后在 HTML 时渲染到屏幕上的位图呈现。
If an svg object attribute is changed then the browser can automatically rerender.
如果 svg 对象属性发生更改,则浏览器可以自动重新使成为。There are many libraries for canvas that add scene-graph capabilities to the canvas element.
有许多画布库可以为画布添加场景图功能元素。Very low level api. Much easier to use a library, especially for hit detection.
非常低级的 api。使用库更容易,尤其是命中检测。
# Animation
- Animation can be canvas, web gl, or just dom manipulation
动画可以是 canvas、web gl 或只是 dom 操作 - Animation requires rendering a scene with changes at a frame rate
动画需要以帧速率渲染具有变化的场景- Old way is with
setInterval()– new way is withrequestAnimationFrame()
- Old way is with
# Canvas
- https://en.wikipedia.org/wiki/Canvas_element
- https://developer.mozilla.org/en-US/docs/Web/API/Canvas_API
- https://developer.mozilla.org/en-US/docs/Web/API/Canvas_API/Tutorial
- https://developer.mozilla.org/en-US/docs/Web/API/Canvas_API/Tutorial/Drawing_shape
- https://developer.mozilla.org/en-US/docs/Web/API/CanvasRenderingContext2D
- Many canvas libraries, some are listed on the Canvas_API page above, another is easeljs
- Web GL is a 3d implementation of canvas
- Conforms closely to OpenGL ES 2.0
- Libraries to make it easier like three.js
# Canvas Basics
- Tag is
canvas. - Should set width and height in html but you can also change it with css.
应该在 html 中设置宽度和高度,但您也可以使用 css 更改它。 - Need an id to select it.
需要一个 id 来选择它。 - Fall back content can be provided inside the canvas tag.
可以在 canvas 标签内提供回退内容。
<canvas id="stockGraph" width="150" height="150"> current stock price: $3.15 +0.15 | |
</canvas> | |
<canvas id="clock" width="150" height="150"> | |
<img src="images/clock.png" width="150" height="150" alt=""/> | |
</canvas> |
# Rendering Context
- You need to get the rendering context to run the drawing commands on
需要获取渲染上下文以在其上运行绘图命令 - You can test for canvas support by seeing if the
getContextfunction exists
可以通过查看getContext函数是否存在,来测试 canvas 支持
var canvas = document.getElementById('tutorial'); | |
if (canvas.getContext){ | |
var ctx = canvas.getContext('2d'); | |
// drawing code here | |
} else { | |
// canvas-unsupported code here | |
} |
# DEMO
<!DOCTYPE html> | |
<html lang="en"> | |
<head> | |
<meta charset="UTF-8"> | |
<title>Document</title> | |
<script type="text/javascript"> | |
document.addEventListener('DOMContentLoaded', function(){ | |
console.log('DOM Loaded...'); | |
var canvas = document.getElementById('mycanvas'); | |
if (canvas.getContext){ | |
var ctx = canvas.getContext('2d'); | |
ctx.fillStyle = "rgb(200,0,0)"; | |
ctx.fillRect(10, 10, 55, 50); | |
ctx.fillStyle = 'rgba(0,0,200,0.5)'; | |
ctx.fillRect(30,30,55,50); | |
ctx.lineWidth = 10; | |
//ctx.strokeRect(100, 100, 150, 150); | |
ctx.fillStyle = 'rgb(200,0,0)'; | |
ctx.fillRect(100, 100, 150, 150); | |
ctx.strokeRect(100, 100, 150, 150); | |
} | |
}); | |
</script> | |
</head> | |
<body> | |
<canvas id="mycanvas" width="400" height="300"> | |
I don't support the canvas element fallback content | |
</canvas> | |
</body> | |
</html> |
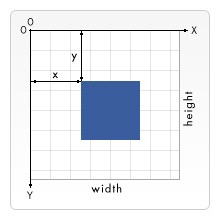
# The Grid
- The canvas is our coordinate space.
canvas 是坐标空间。 - The top left is (0, 0) and it is as wide and tall as the canvas element
左上角是 (0, 0) 和 canvas 元素一样宽和高 - Normally one grid unit corresponds to one pixel
通常一个网格单元对应一个像素 - Grid units can be fractional
网格单位可以是小数 - Be careful drawing lines that do not align with the grid lines. They can not cleanly convert to pixels.
小心绘制与网格线不对齐的线条。它们不能干净地转换为像素。
# Styles and colors
- In general these properties use css syntax
一般来说,这些属性使用 css 语法 - Two basic ones 两个基本的
fillStyle = color- Sets the style used when filling shapes. 设置填充形状时使用的样式。
strokeStyle = color- Sets the style for shapes' outlines. 设置形状轮廓的样式。
// these all set the fillStyle to 'orange’, ctx is the 2d context | |
// 这些都将 fillStyle 设置为 'orange',ctx 是 2d 上下文 | |
ctx.fillStyle = "orange"; | |
ctx.fillStyle = "#FFA500"; ctx.fillStyle = "rgb(255,165,0)"; ctx.fillStyle = "rgba(255,165,0,1)"; |
- Other properties described here.
# Rectangles
- Canvas only has one primitive shape, the rectangle
Canvas 只有一种原始形状,矩形 - These are functions on the context
这些是上下文中的函数
fillRect(x, y, width, height)- Draws a filled rectangle. 绘制一个实心矩形。
strokeRect(x, y, width, height)- Draws a rectangular outline. 绘制矩形轮廓。
clearRect(x, y, width, height)- Clears the specified rectangular area, making it fully transparent. 清除指定的矩形区域,使其完全透明。
# DEMO
<!DOCTYPE html> | |
<html lang="en"> | |
<head> | |
<meta charset="UTF-8"> | |
<title>Document</title> | |
<script type="text/javascript"> | |
document.addEventListener('DOMContentLoaded', function(){ | |
console.log('DOM Loaded...'); | |
var canvas = document.getElementById('mycanvas'); | |
if (canvas.getContext){ | |
var ctx = canvas.getContext('2d'); | |
ctx.fillStyle = 'rgb(200,0,200)'; | |
ctx.beginPath(); | |
ctx.moveTo(50,50); | |
ctx.lineTo(100,50); | |
ctx.lineTo(50, 100); | |
ctx.closePath(); | |
ctx.fill(); | |
ctx.stroke(); | |
} | |
}); | |
</script> | |
</head> | |
<body> | |
<canvas id="mycanvas" width="400" height="300"> | |
I don't support the canvas element fallback content | |
</canvas> | |
</body> | |
</html> |
# Paths
The only other primitive is paths
唯一的其他原语是路径
- Create the path
创建路径 - Use drawing commands to draw into the path
使用绘图命令绘制到路径中 - Close the path
关闭路径 - Fill or stroke to render the path
填充或描边渲染路径
beginPath()- Creates a new path. Once created, future drawing commands are directed into the path and used to build the path up.
创建新路径。 创建后,未来的绘图命令会被定向到路径中并用于构建路径。 - Path methods
- Methods to set different paths for objects.
为对象设置不同路径的方法。 closePath()- Closes the path so that future drawing commands are once again directed to the context.
关闭路径,以便将来的绘图命令再次指向上下文。 stroke()- Draws the shape by stroking its outline.
通过抚摸其轮廓来绘制形状。 fill()- Draws a solid shape by filling the path's content area.
通过填充路径的内容区域来绘制实心形状。
# Path Methods
moveTo(x, y)- Move the pen without drawing
移动笔而不绘图 lineTo(x, y)- Drawing straight lines
画直线
- Draw arcs or circles (measured clockwise from the positive x axis and expressed in radians)
绘制圆弧或圆(从正 x 轴顺时针测量并以弧度表示)
arc(x, y, radius, startAngle, endAngle, anticlockwise)arcTo(x1, y1, x2, y2, radius)- Convert to degrees with this formula:
使用此公式转换为度数 quadraticCurveTo(cp1x, cp1y, x, y)bezierCurveTo(cp1x, cp1y, cp2x, cp2y, x, y)- Bezier and quadratic curves
贝塞尔曲线和二次曲线 rect(x, y, width, height)- Rectangles added to the current path vs rectangle primitive
添加到当前路径的矩形 vs 矩形基元
# DEMO
<!DOCTYPE html> | |
<html lang="en"> | |
<head> | |
<meta charset="UTF-8"> | |
<title>Document</title> | |
<script type="text/javascript"> | |
document.addEventListener('DOMContentLoaded', function(){ | |
console.log('DOM Loaded...'); | |
var canvas = document.getElementById('mycanvas'); | |
if (canvas.getContext){ | |
var ctx = canvas.getContext('2d'); | |
ctx.beginPath(); | |
ctx.arc(250,100,50,((Math.PI/180)*0),(Math.PI/180)*90); | |
ctx.stroke(); | |
//ctx.fill(); | |
ctx.beginPath(); | |
ctx.moveTo(20,20); // Create a starting point | |
ctx.lineTo(100,20); // Create a horizontal line | |
ctx.arcTo(150,20,150,60,30); // Create an arc | |
ctx.lineTo(150,120); // Continue with vertical line | |
ctx.stroke(); // Draw it | |
//ctx.fill(); | |
} | |
}); | |
</script> | |
</head> | |
<body> | |
<canvas id="mycanvas" width="400" height="300"> | |
I don't support the canvas element fallback content | |
</canvas> | |
</body> | |
</html> |
<!DOCTYPE html> | |
<html lang="en"> | |
<head> | |
<meta charset="UTF-8"> | |
<title>Document</title> | |
<script type="text/javascript"> | |
document.addEventListener('DOMContentLoaded', function(){ | |
console.log('DOM Loaded...'); | |
var canvas = document.getElementById('mycanvas'); | |
if (canvas.getContext){ | |
var ctx = canvas.getContext('2d'); | |
// Quadratric curves example | |
ctx.beginPath(); | |
ctx.moveTo(75,25); | |
ctx.quadraticCurveTo(15,5,25,62.5); | |
ctx.stroke(); | |
// Bezier curves example | |
ctx.beginPath(); | |
ctx.moveTo(200,50); | |
ctx.bezierCurveTo(300,20,225,100,300,100); | |
ctx.stroke(); | |
} | |
}); | |
</script> | |
</head> | |
<body> | |
<canvas id="mycanvas" width="400" height="300"> | |
I don't support the canvas element fallback content | |
</canvas> | |
</body> | |
</html> |
<!DOCTYPE html> | |
<html lang="en"> | |
<head> | |
<meta charset="UTF-8"> | |
<title>Document</title> | |
<script type="text/javascript"> | |
document.addEventListener('DOMContentLoaded', function(){ | |
console.log('DOM Loaded...'); | |
var canvas = document.getElementById('mycanvas'); | |
if (canvas.getContext){ | |
var ctx = canvas.getContext('2d'); | |
// Define the points as {x, y} | |
let start = { x: 50, y: 20 }; | |
let cp1 = { x: 210, y: 10 }; | |
let cp2 = { x: 130, y: 170 }; | |
let end = { x: 250, y: 100 }; | |
// Cubic Bézier curve | |
ctx.beginPath(); | |
ctx.moveTo(start.x, start.y); | |
ctx.bezierCurveTo(cp1.x, cp1.y, cp2.x, cp2.y, end.x, end.y); | |
ctx.stroke(); | |
// Start and end points | |
ctx.fillStyle = 'blue'; | |
ctx.beginPath(); | |
ctx.arc(start.x, start.y, 5, 0, 2 * Math.PI); // Start point | |
ctx.arc(end.x, end.y, 5, 0, 2 * Math.PI); // End point | |
ctx.fill(); | |
// Control points | |
ctx.fillStyle = 'red'; | |
ctx.beginPath(); | |
ctx.arc(cp1.x, cp1.y, 5, 0, 2 * Math.PI); // Control point one | |
ctx.arc(cp2.x, cp2.y, 5, 0, 2 * Math.PI); // Control point two | |
ctx.fill(); | |
} | |
}); | |
</script> | |
</head> | |
<body> | |
<canvas id="mycanvas" width="400" height="300"> | |
I don't support the canvas element fallback content | |
</canvas> | |
</body> | |
</html> |
<!DOCTYPE html> | |
<html lang="en"> | |
<head> | |
<meta charset="UTF-8"> | |
<title>Document</title> | |
<script type="text/javascript"> | |
document.addEventListener('DOMContentLoaded', function(){ | |
console.log('DOM Loaded...'); | |
var canvas = document.getElementById('mycanvas'); | |
if (canvas.getContext){ | |
var ctx = canvas.getContext('2d'); | |
// Quadratic Bézier curve | |
ctx.beginPath(); | |
ctx.moveTo(50, 20); | |
ctx.quadraticCurveTo(250, 40, 50, 100); | |
ctx.stroke(); | |
// Start and end points | |
ctx.fillStyle = 'blue'; | |
ctx.beginPath(); | |
ctx.arc(50, 20, 5, 0, 2 * Math.PI); // Start point | |
ctx.arc(50, 100, 5, 0, 2 * Math.PI); // End point | |
ctx.fill(); | |
// Control point | |
ctx.fillStyle = 'red'; | |
ctx.beginPath(); | |
ctx.arc(225, 40, 5, 0, 2 * Math.PI); | |
ctx.fill(); | |
} | |
}); | |
</script> | |
</head> | |
<body> | |
<canvas id="mycanvas" width="400" height="300"> | |
I don't support the canvas element fallback content | |
</canvas> | |
</body> | |
</html> |
<!DOCTYPE html> | |
<html lang="en"> | |
<head> | |
<meta charset="UTF-8"> | |
<title>Document</title> | |
<script type="text/javascript"> | |
document.addEventListener('DOMContentLoaded', function(){ | |
console.log('DOM Loaded...'); | |
var canvas = document.getElementById('mycanvas'); | |
if (canvas.getContext){ | |
var ctx = canvas.getContext('2d'); | |
ctx.beginPath(); | |
ctx.fillStyle = 'rgb(255,0,0)'; | |
ctx.rect(45,45,100,160); | |
ctx.fill(); | |
ctx.beginPath(); | |
ctx.fillStyle = 'rgb(0,0,255)'; | |
ctx.rect(90,90,100,160); | |
ctx.fill(); | |
ctx.stroke(); | |
} | |
}); | |
</script> | |
</head> | |
<body> | |
<canvas id="mycanvas" width="400" height="300"> | |
I don't support the canvas element fallback content | |
</canvas> | |
</body> | |
</html> |
# Path 2d
The path 2d object allows you to cache or record drawing commands.
路径 2d 对象允许您缓存或记录绘图命令。All path methods like
moveTo,rect,arcorquadraticCurveTo, etc., which we got to know above, are available on Path2D objects.
上面知道的所有路径方法,都可用于 Path2D 对象。
Path2D()- The
Path2D()constructor returns a newly instantiated Path2D object, optionally with another path as an argument (creates a copy), or optionally with a string consisting of SVG path data.
Path2D 对象,可选择使用另一个路径作为参数(创建副本),或可选择使用由 SVG 路径数据组成的字符串。
new Path2D(); //empty path object 空路径对象 | |
new Path2D(path); //copy from another Path2D object 从另一个 Path2D 对象复制 | |
new Path2D(d); //path from SVG path data 来自 SVG 路径数据的路径 |
- Can also take in svg data
也可以接收 svg 数据
# DEMO
<!DOCTYPE html> | |
<html lang="en"> | |
<head> | |
<meta charset="UTF-8"> | |
<title>Document</title> | |
<script type="text/javascript"> | |
document.addEventListener('DOMContentLoaded', function(){ | |
console.log('DOM Loaded...'); | |
var canvas = document.getElementById('mycanvas'); | |
if (canvas.getContext){ | |
var ctx = canvas.getContext('2d'); | |
var rectangle = new Path2D(); | |
rectangle.rect(10, 10, 50, 50); | |
var circle = new Path2D(); | |
circle.moveTo(125, 35); | |
circle.arc(100, 35, 25, 0, 2 * Math.PI); | |
ctx.stroke(rectangle); | |
ctx.fill(circle); | |
var svg = new Path2D("M100 100 h 80 v 80 h -80 Z"); | |
ctx.fill(svg); | |
} | |
}); | |
</script> | |
</head> | |
<body> | |
<canvas id="mycanvas" width="400" height="300"> | |
I don't support the canvas element fallback content | |
</canvas> | |
</body> | |
</html> |
# Drawing Text
- Two methods for drawing text
fillText(text, x, y [, maxWidth])- Fills a given text at the given (x,y) position.
在给定的 (x,y) 位置填充给定文本。
Optionally with a maximum width to draw.
可选择绘制最大宽度。 strokeText(text, x, y [, maxWidth])- Strokes a given text at the given (x,y) position.
在给定的 (x,y) 位置描边给定的文本。
Optionally with a maximum width to draw. 可选择绘制最大宽度。 measureText()- Returns a TextMetrics object containing the width, in pixels, that the specified text will be when drawn in the current text style.
返回一个 TextMetrics 对象,其中包含指定文本在当前文本样式中绘制时的宽度(以像素为单位)。
- Text properties here
# DEMO
<!DOCTYPE html> | |
<html lang="en"> | |
<head> | |
<meta charset="UTF-8"> | |
<title>Document</title> | |
<script type="text/javascript"> | |
document.addEventListener('DOMContentLoaded', function(){ | |
console.log('DOM Loaded...'); | |
var canvas = document.getElementById('mycanvas'); | |
if (canvas.getContext){ | |
var ctx = canvas.getContext('2d'); | |
ctx.font = '36px sans-serif'; | |
ctx.fillText("Hello world", 10, 50); | |
var text = ctx.measureText("Hello world"); | |
console.log(text); | |
ctx.fillText(text.width, 10, 100); | |
} | |
}); | |
</script> | |
</head> | |
<body> | |
<canvas id="mycanvas" width="400" height="300"> | |
I don't support the canvas element fallback content | |
</canvas> | |
</body> | |
</html> |
# Images
Importing images into a canvas is basically a two step process:
将图像导入画布基本上是一个两步过程:
Get a reference to an HTMLImageElement object or to another canvas element as a source. It is also possible to use images by providing a
URL.
获取 HTMLImageElement 对象或另一个画布元素的引用作为源。 也可以通过提供 URL 来使用图像。Draw the image on the canvas using the
drawImage()function.
使用drawImage()函数在画布上绘制图像。
Be careful to wait until the image is loaded before using.
请注意等待图像加载后再使用。
Helpful to use the imagesonloadattribute to trigger a callback function
有助于使用图像的 onload 属性触发回调函数drawImagefunction has a few different signaturesdrawImage函数有几个不同的签名
# DEMO
<!DOCTYPE html> | |
<html lang="en"> | |
<head> | |
<meta charset="UTF-8"> | |
<title>Document</title> | |
<script type="text/javascript"> | |
document.addEventListener('DOMContentLoaded', function(){ | |
console.log('DOM Loaded...'); | |
var canvas = document.getElementById('mycanvas'); | |
if (canvas.getContext){ | |
var ctx = canvas.getContext('2d'); | |
ctx.fillStyle = '#ccc'; | |
ctx.fillRect(0,0,400,300); | |
var img = new Image(); // Create new img element | |
img.addEventListener("load", function() { | |
// execute drawImage statements here | |
console.log(img); | |
ctx.drawImage(img, 10, 5); | |
ctx.drawImage(img, 10, 150, 300, 67); | |
//ctx.drawImage(img, 10, 150, 200, 80); | |
}, false); | |
img.src = 'IIT-Footer-Logo.png'; // Set source path | |
} | |
}); | |
</script> | |
</head> | |
<body> | |
<canvas id="mycanvas" width="400" height="300"> | |
I don't support the canvas element fallback content | |
</canvas> | |
</body> | |
</html> |
# Transform
To do transforms you must transform the context or grid and then draw into it.
要进行变换,必须变换上下文或网格,然后绘制到其中。When you are done you need to undo that transform.
完成后,您需要撤消该转换。The
saveandrestorefunction are helpful there and can also be used to save other context states like colors.
函数在那里很有帮助,还可以用来保存其他上下文状态,如颜色。
save()- Saves the entire state of the canvas.
保存画布的整个状态。 restore()- Restores the most recently saved canvas state.
恢复最近保存的画布状态。
- We will look at the transforms here
# DEMO
<!DOCTYPE html> | |
<html lang="en"> | |
<head> | |
<meta charset="UTF-8"> | |
<title>Document</title> | |
<script type="text/javascript"> | |
document.addEventListener('DOMContentLoaded', function(){ | |
console.log('DOM Loaded...'); | |
var canvas = document.getElementById('mycanvas'); | |
if (canvas.getContext){ | |
var ctx = canvas.getContext('2d'); | |
ctx.fillStyle = '#cc0000'; | |
ctx.fillRect(20,20,70,70); | |
ctx.save(); | |
ctx.fillStyle = '#00cc00'; | |
ctx.rotate((Math.PI/180)*45); | |
ctx.fillRect(150,20,70,70); | |
ctx.restore(); | |
ctx.fillRect(150,20,70,70); | |
} | |
}); | |
</script> | |
</head> | |
<body> | |
<canvas id="mycanvas" width="400" height="300"> | |
I don't support the canvas element fallback content | |
</canvas> | |
</body> | |
</html> |
# Basic Animation
- Clear the canvas
清除画布 - Save the canvas state
保存画布状态 - Draw the animated shapes
绘制动画形状 - Restore the state
恢复状态
- You also need a way to trigger your draw frame function on an interval
还需要一种方法以间隔触发并条机功能
setInterval(function, delay)- Starts repeatedly executing the function specified by function every delay milliseconds.
每延迟毫秒开始重复执行函数指定的函数。 setTimeout(function, delay)- Executes the function specified by function in delay milliseconds.
在延迟毫秒内执行函数指定的函数。 requestAnimationFrame(callback)- Tells the browser that you wish to perform an animation and requests that the browser call a specified function to update an animation before the next repaint.
告诉浏览器希望执行动画,并请求浏览器在下一次重绘之前,调用指定的函数来更新动画。
# DEMO
<!DOCTYPE html> | |
<html lang="en"> | |
<head> | |
<meta charset="UTF-8"> | |
<title>Document</title> | |
<script type="text/javascript"> | |
document.addEventListener('DOMContentLoaded', function(){ | |
console.log('DOM Loaded...'); | |
var canvas = document.getElementById('mycanvas'); | |
if (canvas.getContext){ | |
var ctx = canvas.getContext('2d'); | |
var x = 55; | |
var y = 55; | |
var size = 50; | |
var dx = 1; | |
var dy = 5; | |
console.log('request frame'); | |
window.requestAnimationFrame(drawFrame); | |
} | |
function drawFrame(){ | |
var ctx = canvas.getContext('2d'); | |
ctx.clearRect(0,0,400,300); // clear canvas | |
//console.log('x ' + x); | |
//ctx.fillRect(x,y,size,size); | |
ctx.beginPath(); | |
ctx.arc(x,y,size,0,2*Math.PI); | |
ctx.fill(); | |
if ((x - size) <= 0 || (x + size) >= 400) { | |
dx = -dx; | |
} | |
if ((y - size) <= 0 || (y + size) >= 300) { | |
dy = -dy; | |
} | |
x += dx; | |
y += dy; | |
window.requestAnimationFrame(drawFrame); | |
//console.log('draw frame'); | |
} | |
}); | |
</script> | |
</head> | |
<body> | |
<canvas id="mycanvas" width="400" height="300"> | |
I don't support the canvas element fallback content | |
</canvas> | |
</body> | |
</html> |
# Canvas Libraries
- There are canvas libraries that make this easier
有 Canvas Libraries 可以让这更容易 EaselJSis one that turns the canvas into a retained mode drawing context
EaselJS 是将画布转换为保留模式绘制上下文的工具- http://www.createjs.com/easeljs
- http://code.tutsplus.com/tutorials/using-createjs-easeljs--net-34840
# WebGL
WebGL is a JavaScript API that allows 2d and 3d rendering using an API very close to OpenGL ES 2.0 and usually uses hardware rendering in compatible browsers.
WebGL 是一个 JavaScript API,它允许使用非常接近 OpenGL ES 2.0 的 API 进行 2d 和 3d 渲染,并且通常在兼容的浏览器中使用硬件渲染。Difficult to work with if you are not familiar with OpenGL
如果您不熟悉 OpenGL,则难以使用There are libraries that make it easier but still much more complex than canvas 2d
有一些库可以使它更容易,但仍然比 canvas 2d 复杂得多- ThreeJS is one of the most popular
# DEMO
<!DOCTYPE html> | |
<html> | |
<head> | |
<meta charset=utf-8> | |
<title>My first Three.js app</title> | |
<script src="http://threejs.org/build/three.min.js"></script> | |
<style> | |
body { margin: 0; } | |
canvas { width: 100%; height: 100% } | |
</style> | |
</head> | |
<body> | |
<script> | |
// Our Javascript will go here. | |
var scene = new THREE.Scene(); | |
var camera = new THREE.PerspectiveCamera( 75, window.innerWidth / window.innerHeight, 0.1, 1000 ); | |
var renderer = new THREE.WebGLRenderer(); | |
renderer.setSize( window.innerWidth, window.innerHeight ); | |
document.body.appendChild( renderer.domElement ); | |
var geometry = new THREE.BoxGeometry( 1, 1, 1 ); | |
//var material = new THREE.MeshBasicMaterial( { color: 0x00ff00 } ); | |
var material = new THREE.MeshPhongMaterial( { color: 0xdddddd, specular: 0x009900, shininess: 30, shading: THREE.FlatShading } ); | |
var cube = new THREE.Mesh( geometry, material ); | |
scene.add( cube ); | |
camera.position.z = 5; | |
var spotLight = new THREE.SpotLight( 0xffffff ); | |
spotLight.position.set( 200, 100, 200 ); | |
spotLight.intensity = 1.1; | |
spotLight.castShadow = true; | |
spotLight.shadowMapWidth = 1024; | |
spotLight.shadowMapHeight = 1024; | |
spotLight.shadowCameraNear = 500; | |
spotLight.shadowCameraFar = 4000; | |
spotLight.shadowCameraFov = 30; | |
scene.add( spotLight ); | |
function render() { | |
requestAnimationFrame( render ); | |
renderer.render( scene, camera ); | |
cube.rotation.x += 0.01; | |
cube.rotation.y += 0.01; | |
} | |
render(); | |
</script> | |
</body> | |
</html> |