# Notes
# Getting started with FX
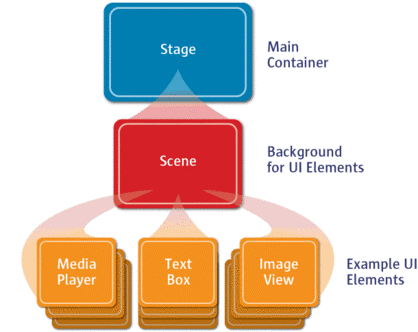
The start method is the heart of any JavaFX application.
The method is called when the application is loaded, and a reference to the application's primary Stage is passed as a parameter.
The start method creates the Scene object and displays it in the stage.
Pictoral shown below.
@Override | |
public void start(Stage primaryStage) { | |
Group root = new Group(); | |
Scene scene = new Scene(root, 300, 250); | |
primaryStage.setScene(scene); | |
primaryStage.setTitle("The Click Me App"); | |
primaryStage.show(); | |
} |
# Scenebuilder
JavaFX Scene Builder is a visual layout tool that lets users quickly design JavaFX application user interfaces, without coding.
Users can drag and drop UI components to a work area, modify their properties, apply style sheets, and the FXML code for the layout that they are creating is automatically generated in the background! The result is an FXML file that can then be combined with a Java project by binding the UI to the application's logic.
- Download the latest scenebuilder for your OS at http://gluonhq.com/products/scene-builder/
- Install scenebuilder in your OS. Remember the path where you install it at.
- Lastly set your path in Eclipse under Preferences, so you can drag and drop and view your UI components from within Eclipse.
To set your path, do the following depending on your OS.
Set the SceneBuilder executable path in Eclipse as follows: - (Windows) Window -> Preferences -> JavaFX. For the (Mac) Eclipse -> Preferences… -> JavaFX
- Click "Browse" and navigate to your bash file (linux) or where the
SceneBuilder.exe(windows) is or for (Mac)SceneBuilder.app, which is most likely in your Applications folder, and choose your file and click Apply and Close to finish.
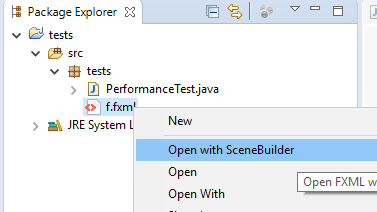
Now when you add any FXML file to your app (File > New > Other > JavaFX > New FXML Document) you can open the file up in Scene Builder by right clicking your FXML file and choose Scene Builder to open the file for creating / editing / viewing!
# Basic Layout panes
Layout panes in JavaFX let you manage the placement controls and shapes that appear in your scenes. Don't forget that a layout pane is itself a node, so you can nest layout panes within other layout panes to create complicated layouts.
HBox hbox1 = new HBox(10); // sets initial spacing | |
hbox1.getChildren().addAll(btn1, btn2, btn3); | |
hbox1.setAlignment(Pos.CENTER); | |
hbox1.setPadding(new Insets(10)); | |
hbox1.setSpacing(10); |
VBox vbox1 = new VBox(10); // sets initial spacing | |
vbox1.getChildren().addAll(btn1, btn2, btn3); | |
vbox1.setAlignment(Pos.CENTER); | |
vbox1.setPadding(new Insets(10)); | |
vbox1.setSpacing(10); |
FlowPane flow1 = new FlowPane(10, 10); | |
flow1.getChildren().addAll(btn1, btn2, btn3); | |
flow1.setAlignment(Pos.CENTER); | |
flow1.setOrientation(Orientation.VERTICAL); | |
flow1.setVgap(10); | |
flow1.setHgap(10); | |
flow1.setPrefWrapLength(5); |
BorderPane border1 = new BorderPane(); | |
border1.setCenter(btn1); | |
border1.setTop(btn2); | |
border1.setRight(btn3); | |
border1.setBottom(btn4); | |
border1.setLeft(btn5); |
# Basic Controls
JavaFX defines a plethora of controls that you use to interact with the user. The most commonly used are Label, Button, TextField, CheckBox, and RadioButton.
Label lbl = new Label("This is a label"); |
Button btn = new Button("Click Me!"); | |
btn.setOnAction(e -> System.out.println("Click")); |
TextField txtInput = new TextField("Prompt Text"); | |
String input = txtInput.getText(); |
CheckBox chkOption = new CheckBox("Check Box Text"); | |
if (chkOption.isSelected()) | |
System.out.println("Option is selected"); |
RadioButton rdo1 = new RadioButton("Option 1"); | |
RadioButton rdo2 = new RadioButton("Option 2"); | |
rdo1.setSelected(true); | |
ToggleGroup options = new ToggleGroup(); | |
options.getToggles().addAll(rdo1, rdo2); | |
if (rdo1.isSelected()) | |
System.out.println("Option 1 is selected"); |
# Demo
# Switch
uses lambda functions to trigger events.
Trigger app from TwoScene.java file.
Includes programmatic CSS features and lambda functions.
package application; | |
import javafx.application.Application; | |
import javafx.event.ActionEvent; | |
import javafx.scene.Scene; | |
import javafx.scene.control.Button; | |
import javafx.scene.control.Label; | |
import javafx.scene.layout.FlowPane; | |
import javafx.stage.Modality; | |
import javafx.stage.Stage; | |
public class TwoScene extends Application { | |
Button btnscene1, btnscene2; | |
Label lblscene1, lblscene2; | |
FlowPane pane1, pane2; | |
Scene scene1, scene2; | |
Stage thestage, stage; | |
@Override | |
public void start(Stage primaryStage) throws Exception { | |
// thestage=primaryStage; | |
// can now use the stage in other methods | |
// make things to put on panes | |
btnscene1 = new Button("Click to go to Other Scene"); | |
btnscene2 = new Button("Click to go back to First Scene"); | |
// btnscene1.setStyle("-fx-font: 24 arial;"); | |
btnscene1.setOnAction(e -> ButtonClicked(e)); | |
btnscene2.setOnAction(e -> ButtonClicked(e)); | |
lblscene1 = new Label("Scene 1"); | |
lblscene2 = new Label("Scene 2"); | |
// make 2 Panes | |
pane1 = new FlowPane(); | |
pane2 = new FlowPane(); | |
pane1.setVgap(10); | |
pane2.setVgap(10); | |
// set background color of each Pane | |
pane1.setStyle("-fx-background-color: tan;-fx-padding: 10px;"); | |
pane2.setStyle("-fx-background-color: red;-fx-padding: 10px;"); | |
// add everything to panes | |
pane1.getChildren().addAll(lblscene1, btnscene1); | |
pane2.getChildren().addAll(lblscene2, btnscene2); | |
// make 2 scenes from 2 panes | |
scene1 = new Scene(pane1, 225, 100); | |
scene2 = new Scene(pane2, 225, 100); | |
stage = new Stage(); | |
stage.setScene(scene2); | |
stage.initModality(Modality.APPLICATION_MODAL); | |
primaryStage.setTitle("Hello World!"); | |
primaryStage.setScene(scene1); | |
primaryStage.show(); | |
} | |
public void ButtonClicked(ActionEvent e) | |
{ | |
if (e.getSource() == btnscene2) | |
stage.close(); | |
else | |
stage.showAndWait(); | |
/* alt. coding | |
* if (e.getSource()==btnscene1) thestage.setScene(scene2); else | |
* thestage.setScene(scene1); | |
*/ | |
} | |
public static void main(String[] args) { | |
launch(args); | |
} | |
} |
# Login
jump from scene to scene upon a successful login.
Includes Button UI event.
Trigger LoginDemoApplication.java file.
package login; | |
import java.io.IOException; | |
import javafx.application.Application; | |
import javafx.scene.Scene; | |
import javafx.scene.layout.*; | |
import javafx.stage.Stage; | |
import login.LoginManager; | |
/** Main application class for the login demo application */ | |
public class LoginDemoApplication extends Application { | |
public static void main(String[] args) { launch(args); } | |
@Override public void start(Stage stage) throws IOException { | |
Scene scene = new Scene(new StackPane()); | |
LoginManager loginManager = new LoginManager(scene); | |
loginManager.showLoginScreen(); | |
stage.setScene(scene); | |
stage.show(); | |
} | |
} |
package login; | |
import java.io.IOException; | |
import javafx.fxml.FXMLLoader; | |
import javafx.scene.Parent; | |
import javafx.scene.Scene; | |
/** Manages control flow for logins */ | |
public class LoginManager { | |
private Scene scene; | |
public LoginManager(Scene scene) { | |
this.scene = scene; | |
} | |
/** | |
* Callback method invoked to notify that a user has been authenticated. Will | |
* show the main application screen. | |
*/ | |
public void authenticated(String sessionID) { | |
showMainView(sessionID); | |
} | |
/** | |
* Callback method invoked to notify that a user has logged out of the main | |
* application. Will show the login application screen. | |
*/ | |
public void logout() { | |
showLoginScreen(); | |
} | |
public void showLoginScreen() { | |
try { | |
FXMLLoader loader = new FXMLLoader(getClass().getResource("login.fxml")); | |
scene.setRoot((Parent) loader.load()); | |
LoginController controller = loader.getController(); | |
controller.initManager(this); | |
} catch (IOException ex) { | |
ex.printStackTrace(); | |
} | |
} | |
private void showMainView(String sessionID) { | |
try { | |
FXMLLoader loader = new FXMLLoader(getClass().getResource("mainview.fxml")); | |
scene.setRoot((Parent) loader.load()); | |
MainViewController controller = loader.getController(); | |
controller.initSessionID(this, sessionID); | |
} catch (IOException ex) { | |
ex.printStackTrace(); | |
} | |
} | |
} |
package login; | |
import javafx.fxml.FXML; | |
import javafx.scene.control.*; | |
/** Controls the login screen */ | |
public class LoginController { | |
@FXML private TextField user; | |
@FXML private TextField password; | |
@FXML private Button loginButton; | |
// public void initialize() {} | |
public void initManager(final LoginManager loginManager) { | |
loginButton.setOnAction((e) -> { | |
String sessionID = authorize(); | |
if (sessionID != null) | |
loginManager.authenticated(sessionID); | |
}); | |
} | |
/** | |
* Check authorization credentials. | |
* | |
* If accepted, return a sessionID for the authorized session | |
* otherwise, return null. | |
*/ | |
private String authorize() { | |
return | |
"open".equals(user.getText()) && "sesame".equals(password.getText()) | |
? generateSessionID() | |
: null; | |
} | |
private static int sessionID = 0; | |
private String generateSessionID() { | |
sessionID++; | |
return "xyzzy - session " + sessionID; | |
} | |
} |
package login; | |
import javafx.fxml.FXML; | |
import javafx.scene.control.Button; | |
import javafx.scene.control.Label; | |
/** Controls the main application screen */ | |
public class MainViewController { | |
@FXML private Button logoutButton; | |
@FXML private Label sessionLabel; | |
public void initSessionID(final LoginManager loginManager, String sessionID) { | |
sessionLabel.setText(sessionID); | |
logoutButton.setOnAction(e->loginManager.logout()); | |
} | |
} |
<?xml version="1.0" encoding="UTF-8"?> | |
<?import java.lang.*?> | |
<?import java.util.*?> | |
<?import javafx.geometry.*?> | |
<?import javafx.scene.control.*?> | |
<?import javafx.scene.layout.*?> | |
<?import javafx.scene.paint.*?> | |
<StackPane prefWidth="231.0" xmlns:fx="http://javafx.com/fxml" fx:controller="login.LoginController"> | |
<children> | |
<StackPane> | |
<children> | |
<VBox spacing="10.0"> | |
<children> | |
<GridPane> | |
<children> | |
<Label text="Username:" GridPane.columnIndex="0" GridPane.rowIndex="0" /> | |
<Label text="Password:" GridPane.columnIndex="0" GridPane.rowIndex="1" /> | |
<TextField fx:id="user" promptText="Use "open" to login" text="open" GridPane.columnIndex="1" GridPane.rowIndex="0" /> | |
<TextField fx:id="password" promptText="Use "sesame" to login" text="sesame" GridPane.columnIndex="1" GridPane.rowIndex="1" /> | |
</children> | |
<columnConstraints> | |
<ColumnConstraints hgrow="SOMETIMES" maxWidth="148.0" minWidth="10.0" prefWidth="109.0" /> | |
<ColumnConstraints hgrow="SOMETIMES" maxWidth="228.0" minWidth="10.0" prefWidth="189.0" /> | |
</columnConstraints> | |
<rowConstraints> | |
<RowConstraints minHeight="10.0" prefHeight="30.0" vgrow="SOMETIMES" /> | |
<RowConstraints minHeight="10.0" prefHeight="30.0" vgrow="SOMETIMES" /> | |
</rowConstraints> | |
</GridPane> | |
<StackPane prefHeight="-1.0" prefWidth="-1.0"> | |
<children> | |
<Button fx:id="loginButton" alignment="CENTER" defaultButton="true" mnemonicParsing="false" text="Login" StackPane.alignment="CENTER_RIGHT" /> | |
</children> | |
</StackPane> | |
</children> | |
</VBox> | |
</children> | |
</StackPane> | |
</children> | |
<padding> | |
<Insets bottom="10.0" left="10.0" right="10.0" top="10.0" /> | |
</padding> | |
</StackPane> |
<?xml version="1.0" encoding="UTF-8"?> | |
<?import java.lang.*?> | |
<?import java.util.*?> | |
<?import javafx.geometry.*?> | |
<?import javafx.scene.control.*?> | |
<?import javafx.scene.layout.*?> | |
<?import javafx.scene.paint.*?> | |
<StackPane prefWidth="231.0" xmlns:fx="http://javafx.com/fxml" fx:controller="login.MainViewController"> | |
<children> | |
<StackPane> | |
<children> | |
<VBox spacing="10.0"> | |
<children> | |
<GridPane> | |
<children> | |
<Label text="Session ID:" GridPane.columnIndex="0" GridPane.rowIndex="0" /> | |
<Label fx:id="sessionLabel" text="Undefined" GridPane.columnIndex="1" GridPane.rowIndex="0" /> | |
</children> | |
<columnConstraints> | |
<ColumnConstraints hgrow="SOMETIMES" maxWidth="148.0" minWidth="10.0" prefWidth="109.0" /> | |
<ColumnConstraints hgrow="SOMETIMES" maxWidth="228.0" minWidth="10.0" prefWidth="189.0" /> | |
</columnConstraints> | |
<rowConstraints> | |
<RowConstraints minHeight="10.0" prefHeight="30.0" vgrow="SOMETIMES" /> | |
<RowConstraints minHeight="10.0" prefHeight="30.0" vgrow="SOMETIMES" /> | |
</rowConstraints> | |
</GridPane> | |
<StackPane prefHeight="-1.0" prefWidth="-1.0"> | |
<children> | |
<Button id="loginButton" fx:id="logoutButton" alignment="CENTER" defaultButton="true" mnemonicParsing="false" text="Logout" StackPane.alignment="CENTER_RIGHT" /> | |
</children> | |
</StackPane> | |
</children> | |
</VBox> | |
</children> | |
</StackPane> | |
</children> | |
<padding> | |
<Insets bottom="10.0" left="10.0" right="10.0" top="10.0" /> | |
</padding> | |
</StackPane> |
# FXMenus
Two packages! Use of Controller, SceneBuilder.
Includes menu click events.
Run either Main.java file from either package.
package application; | |
import javafx.application.Application; | |
import javafx.beans.property.ReadOnlyDoubleProperty; | |
import javafx.event.ActionEvent; | |
import javafx.event.EventHandler; | |
import javafx.scene.Group; | |
import javafx.scene.Scene; | |
import javafx.scene.control.Menu; | |
import javafx.scene.control.MenuBar; | |
import javafx.scene.control.MenuItem; | |
import javafx.scene.paint.Color; | |
import javafx.stage.Stage; | |
/** | |
* Example of creating menus in JavaFX. | |
* | |
* @author me | |
*/ | |
public class Main extends Application | |
{ | |
/** | |
* Manually build menu bar with included menus for this demonstration. | |
* | |
* @param menuWidthProperty Width to be bound to menu bar width. | |
* @return Menu Bar with menus included. | |
*/ | |
private MenuBar buildMenuBarWithMenus(final ReadOnlyDoubleProperty menuWidthProperty) | |
{ | |
final MenuBar menuBar = new MenuBar(); | |
// Prepare left-most 'File' drop-down menu | |
final Menu fileMenu = new Menu("File"); | |
fileMenu.getItems().add(new MenuItem("Open")); | |
menuBar.getMenus().add(fileMenu); | |
// Prepare 'Examples' drop-down menu | |
final Menu examplesMenu = new Menu("JavaFX Menu Examples"); | |
examplesMenu.getItems().add(new MenuItem("Text Example")); | |
menuBar.getMenus().add(examplesMenu); | |
fileMenu.setOnAction(new EventHandler<ActionEvent>() { | |
@Override public void handle(ActionEvent e) { | |
System.out.println("Opening Database Connection..."); | |
} | |
}); | |
// bind width of menu bar to width of associated stage | |
menuBar.prefWidthProperty().bind(menuWidthProperty); | |
return menuBar; | |
} | |
/** | |
* Start of JavaFX application demonstrating menu support. | |
* | |
* @param stage Primary stage. | |
*/ | |
@Override | |
public void start(final Stage stage) | |
{ | |
stage.setTitle("Programmatic Menu 1"); | |
final Group rootGroup = new Group(); | |
final Scene scene = new Scene(rootGroup, 800, 400, Color.WHEAT); | |
final MenuBar menuBar = buildMenuBarWithMenus(stage.widthProperty()); | |
rootGroup.getChildren().add(menuBar); | |
stage.setScene(scene); | |
stage.show(); | |
} | |
/** | |
* Main executable function for running examples. | |
* | |
* @param arguments Command-line arguments: none expected. | |
*/ | |
public static void main(final String[] arguments) | |
{ | |
Application.launch(arguments); | |
} | |
} |
package application; | |
import java.io.IOException; | |
import javafx.application.Application; | |
import javafx.fxml.FXML; | |
import javafx.fxml.FXMLLoader; | |
import javafx.scene.Scene; | |
import javafx.scene.control.Menu; | |
import javafx.scene.control.MenuItem; | |
import javafx.scene.layout.AnchorPane; | |
import javafx.stage.Stage; | |
public class menuController extends Application { | |
@FXML | |
private Menu File; | |
@FXML | |
private MenuItem Close; | |
/** | |
* JavaFX application demonstrating menu that was created via Scene Builder. | |
* | |
* @param stage | |
* Primary stage. | |
* @throws IOException | |
*/ | |
@Override | |
public void start(Stage stage) throws IOException { | |
FXMLLoader loader = new FXMLLoader(getClass().getResource("/application/main.fxml")); | |
AnchorPane root = (AnchorPane) loader.load(); | |
stage.setTitle("SceneBuilder Menu"); | |
Scene scene = new Scene(root); | |
stage.setScene(scene); | |
stage.show(); | |
} | |
public void closeOut() { | |
// body | |
System.out.print("Close item event action"); | |
} | |
public static void main(String[] args) { | |
// TODO Auto-generated method stub | |
launch(args); | |
} | |
} |
<?xml version="1.0" encoding="UTF-8"?> | |
<?import java.lang.*?> | |
<?import javafx.scene.control.*?> | |
<?import javafx.scene.layout.*?> | |
<AnchorPane id="ap" maxHeight="-Infinity" maxWidth="-Infinity" minHeight="-Infinity" minWidth="-Infinity" prefHeight="400.0" prefWidth="600.0" xmlns="http://javafx.com/javafx/8.0.40" xmlns:fx="http://javafx.com/fxml/1" fx:controller="application.menuController"> | |
<children> | |
<MenuBar id="myMenu"> | |
<menus> | |
<Menu fx:id="File" mnemonicParsing="false" text="File"> | |
<items> | |
<MenuItem fx:id="Close" mnemonicParsing="false" onAction="#closeOut" text="Close" /> | |
</items> | |
</Menu> | |
<Menu mnemonicParsing="false" text="Edit"> | |
<items> | |
<MenuItem mnemonicParsing="false" text="Delete" /> | |
</items> | |
</Menu> | |
<Menu mnemonicParsing="false" text="Sleep"> | |
<items> | |
<MenuItem mnemonicParsing="false" text="Now" /> | |
</items> | |
</Menu> | |
</menus> | |
</MenuBar> | |
<Label layoutX="253.0" layoutY="139.0" text="Welcome!" /> | |
</children> | |
</AnchorPane> |
# FXTableSB
for rendering a Table View in SB.
Includes a controller file.
Trigger Main.java file.
package application; | |
import javafx.application.Application; | |
import javafx.fxml.FXMLLoader; | |
import javafx.scene.Parent; | |
import javafx.scene.Scene; | |
import javafx.stage.Stage; | |
public class Main extends Application { | |
@Override | |
public void start(Stage stage) throws Exception { | |
Parent root = FXMLLoader.load(getClass().getResource("FXMLDocument.fxml")); | |
Scene scene = new Scene(root); | |
stage.setScene(scene); | |
stage.show(); | |
} | |
public static void main(String[] args) { | |
launch(args); | |
} | |
} |
package application; | |
import java.net.URL; | |
import java.util.ResourceBundle; | |
import javafx.beans.property.SimpleStringProperty; | |
import javafx.collections.FXCollections; | |
import javafx.collections.ObservableList; | |
import javafx.event.ActionEvent; | |
import javafx.fxml.FXML; | |
import javafx.fxml.Initializable; | |
import javafx.scene.control.Label; | |
import javafx.scene.control.TableColumn; | |
import javafx.scene.control.TableView; | |
import javafx.scene.control.TextField; | |
import javafx.scene.control.cell.PropertyValueFactory; | |
public class FXMLDocumentController implements Initializable { | |
@FXML | |
private Label label; | |
@FXML | |
private TableView<Person> table;// = new TableView<Person>(); | |
@FXML private TableColumn firstNameCol ; | |
@FXML private TableColumn lastNameCol ; | |
@FXML private TableColumn emailCol ; | |
@FXML TextField addFirstName; | |
@FXML TextField addLastName; | |
@FXML TextField addEmail; | |
private final ObservableList<Person> data | |
= FXCollections.observableArrayList( | |
new Person("Jacob", "Smith", "jacob.smith@example.com"), | |
new Person("Isabella", "Johnson", "isabella.johnson@example.com"), | |
new Person("Ethan", "Williams", "ethan.williams@example.com"), | |
new Person("Emma", "Jones", "emma.jones@example.com"), | |
new Person("Michael", "Brown", "michael.brown@example.com") | |
); | |
@FXML | |
private void handleButtonAction(ActionEvent event) { | |
System.out.println("You clicked me!"); | |
data.add(new Person( | |
addFirstName.getText(), | |
addLastName.getText(), | |
addEmail.getText())); | |
addFirstName.clear(); | |
addLastName.clear(); | |
addEmail.clear(); | |
} | |
@Override | |
public void initialize(URL url, ResourceBundle rb) { | |
// TODO | |
firstNameCol.setMinWidth(100); | |
lastNameCol.setMinWidth(100); | |
emailCol.setMinWidth(200); | |
table.getItems().setAll(this.data); | |
firstNameCol.setCellValueFactory(new PropertyValueFactory("firstName")); | |
lastNameCol.setCellValueFactory(new PropertyValueFactory("lastName")); | |
emailCol.setCellValueFactory(new PropertyValueFactory("email")); | |
} | |
public static class Person { | |
private final SimpleStringProperty firstName; | |
private final SimpleStringProperty lastName; | |
private final SimpleStringProperty email; | |
private Person(String fName, String lName, String email) { | |
this.firstName = new SimpleStringProperty(fName); | |
this.lastName = new SimpleStringProperty(lName); | |
this.email = new SimpleStringProperty(email); | |
} | |
public String getFirstName() { | |
return firstName.get(); | |
} | |
public void setFirstName(String fName) { | |
firstName.set(fName); | |
} | |
public String getLastName() { | |
return lastName.get(); | |
} | |
public void setLastName(String fName) { | |
lastName.set(fName); | |
} | |
public String getEmail() { | |
return email.get(); | |
} | |
public void setEmail(String fName) { | |
email.set(fName); | |
} | |
} | |
} |
<?xml version="1.0" encoding="UTF-8"?> | |
<?import java.lang.*?> | |
<?import java.util.*?> | |
<?import javafx.scene.*?> | |
<?import javafx.scene.control.*?> | |
<?import javafx.scene.layout.*?> | |
<AnchorPane id="AnchorPane" prefHeight="380.0" prefWidth="462.0" xmlns:fx="http://javafx.com/fxml/1" xmlns="http://javafx.com/javafx/8" fx:controller="application.FXMLDocumentController"> | |
<children> | |
<Button fx:id="button" layoutX="325.0" layoutY="324.0" onAction="#handleButtonAction" text="Click Me!" /> | |
<Label fx:id="label" layoutX="126" layoutY="120" minHeight="16" minWidth="69" /> | |
<TableView fx:id="table" layoutX="26.0" layoutY="29.0" prefHeight="221.0" prefWidth="411.0"> | |
<columns> | |
<TableColumn fx:id="firstNameCol" prefWidth="75.0" text="First Name" > | |
</TableColumn> | |
<TableColumn fx:id="lastNameCol" prefWidth="75.0" text="Last Name" /> | |
<TableColumn fx:id="emailCol" prefWidth="75.0" text="Email" /> | |
</columns> | |
</TableView> | |
<TextField fx:id="addFirstName" layoutX="26.0" layoutY="284.0" prefHeight="25.0" prefWidth="81.0" promptText="First Name" /> | |
<TextField fx:id="addLastName" layoutX="121.0" layoutY="284.0" prefHeight="25.0" prefWidth="89.0" promptText="Last Name" /> | |
<TextField fx:id="addEmail" layoutX="222.0" layoutY="284.0" promptText="Email" /> | |
</children> | |
</AnchorPane> |
# JAVAFXTableView
for rendering a JTable style output.
Includes customized CSS file styles.css .
Trigger DynamicTable.java file.
package apps; | |
import java.sql.Connection; | |
import java.sql.ResultSet; | |
import java.util.concurrent.atomic.AtomicLong; | |
import connection.DBConnect; | |
import javafx.application.Application; | |
import javafx.application.Platform; | |
import javafx.beans.property.SimpleStringProperty; | |
import javafx.beans.value.ObservableValue; | |
import javafx.collections.FXCollections; | |
import javafx.collections.ObservableList; | |
import javafx.scene.Scene; | |
import javafx.scene.control.TableColumn; | |
import javafx.scene.control.TableColumn.CellDataFeatures; | |
import javafx.scene.control.TableView; | |
import javafx.stage.Stage; | |
import javafx.util.Callback; | |
public class DynamicTable extends Application { | |
// TABLE VIEW AND DATA OBJECT CREATIONS | |
@SuppressWarnings("rawtypes") | |
private ObservableList<ObservableList> data; | |
@SuppressWarnings("rawtypes") | |
private TableView tableview; | |
// CONNECTION DATABASE | |
@SuppressWarnings({ "unchecked", "rawtypes" }) | |
public void buildData() { | |
DBConnect c = new DBConnect(); | |
data = FXCollections.observableArrayList(); | |
try { | |
Connection conn = c.connect(); | |
// SQL FOR SELECTING DATA | |
String SQL = "SELECT id,name, address from jpapa_bank"; | |
// ResultSet object | |
ResultSet rs = conn.createStatement().executeQuery(SQL); | |
/********************************** | |
* TABLE COLUMN ADDED DYNAMICALLY * | |
**********************************/ | |
for (int i = 0; i < rs.getMetaData().getColumnCount(); i++) { | |
// We are using non property style for making dynamic table | |
final int j = i; | |
TableColumn col = new TableColumn(rs.getMetaData().getColumnName(i + 1)); | |
/** | |
* Build an ObservableList for column headings as you iterate thru meta data | |
* setup callback Api for column retrievals, works with call method to return | |
* heading names | |
*/ | |
col.setCellValueFactory( | |
new Callback<CellDataFeatures<ObservableList, String>, ObservableValue<String>>() { | |
public ObservableValue<String> call(CellDataFeatures<ObservableList, String> param) { | |
return new SimpleStringProperty(param.getValue().get(j).toString()); | |
} | |
}); | |
// add each column name to tableview object | |
tableview.getColumns().add(col); | |
// display column names to console as they are added to table dynamically | |
System.out.println("Column [" + i + "] added [" + rs.getMetaData().getColumnName(i + 1) + "]"); | |
} | |
/******************************** | |
* Data added to ObservableList dynamically * | |
********************************/ | |
int ridx = 0; // track a row index to display to console added rows to table | |
while (rs.next()) { | |
// Iterate Row | |
ObservableList<String> row = FXCollections.observableArrayList(); | |
for (int i = 1; i <= rs.getMetaData().getColumnCount(); i++) { | |
// Iterate Column, grab data | |
row.add(rs.getString(i)); | |
} | |
System.out.println("Row [" + (ridx++) + "] added " + row); | |
data.add(row); | |
} | |
// automatically adjust width of columns depending on their content | |
tableview.setColumnResizePolicy((param) -> true); | |
Platform.runLater(() -> customResize(tableview)); | |
// add data to tableview object | |
tableview.setItems(data); | |
} catch (Exception e) { | |
e.printStackTrace(); | |
System.out.println("Error on Building Data"); | |
} | |
} | |
public void customResize(TableView<?> view) { | |
AtomicLong width = new AtomicLong(); | |
view.getColumns().forEach(col -> { | |
width.addAndGet((long) col.getWidth()); | |
}); | |
double tableWidth = view.getWidth(); | |
if (tableWidth > width.get()) { | |
view.getColumns().forEach(col -> { | |
col.setPrefWidth(col.getWidth() + ((tableWidth - width.get()) / view.getColumns().size())); | |
}); | |
} | |
} | |
@SuppressWarnings("rawtypes") | |
@Override | |
public void start(Stage stage) throws Exception { | |
// Instantiate TableView object | |
tableview = new TableView(); | |
buildData(); | |
// Main Scene | |
Scene scene = new Scene(tableview, 800, 400); | |
scene.getStylesheets().add(getClass().getResource("styles.css").toExternalForm()); | |
stage.setScene(scene); | |
stage.show(); | |
} | |
// MAIN EXECUTOR | |
public static void main(String[] args) { | |
launch(args); | |
} | |
} |
.root{ | |
-fx-font-size: 14pt; | |
-fx-font-family: "Courier New"; | |
-fx-base: rgb(132, 202, 248); | |
-fx-background: rgb(225, 220, 203); | |
} | |
.highlightedRow { | |
-fx-background-color: brown; | |
-fx-background-insets: 0, 1, 2; | |
-fx-background: -fx-accent; | |
-fx-text-fill: -fx-selection-bar-text; | |
} |
package connection; | |
import java.sql.Connection; | |
import java.sql.DriverManager; | |
import java.sql.SQLException; | |
public class DBConnect { | |
// Code database URL | |
static final String DB_URL = "jdbc:mysql://www.papademas.net:3307/510fp?autoReconnect=true&useSSL=false"; | |
// Database credentials | |
static final String USER = "fp510", PASS = "510"; | |
public Connection connect() throws SQLException { | |
return DriverManager.getConnection(DB_URL, USER, PASS); | |
} | |
} |
# Refs
http://www.oracle.com/technetwork/java/javase/overview/javafx-overview-2158620.html
http://docs.oracle.com/javase/8/javase-clienttechnologies.htm
https://docs.oracle.com/javafx/2/overview/jfxpub-overview.htm
(Master-Detail view)
https://code.makery.ch/library/javafx-tutorial/
Dialogs (various popup boxes)!
http://code.makery.ch/blog/javafx-dialogs-official/
FX Chart City!!!
http://docs.oracle.com/javase/8/javafx/user-interface-tutorial/charts.htm
Totally cool text features
https://docs.oracle.com/javase/8/javafx/user-interface-tutorial/text-settings.htm
FX layouts
https://docs.oracle.com/javafx/2/layout/builtin_layouts.htm#CHDGHCDG
Simply CSS!
http://www.guigarage.com/2016/02/javafx-and-css/
# Lab
PROJECT
Bank record loan generation reportObjective
To write a program with a MVCsimulatedapproach that performs a Loan analysis from class objects created in lab #2.
# PROJECT DESCRIPTION
Bank of IIT now needs your help in deciphering whom from its records should be exclusive to premium loans versus those offered micro or less premium loans.
现在,IIT 银行需要您的帮助才能确定哪些人是其记录中的专有贷款,而不是那些提供了小额或更少保费贷款的人。
Use a database to store then present Loan analysis information from your data BankRecords objects you worked on in prior labs.
使用数据库来存储,然后显示您在先前实验中工作过的数据 BankRecords 对象中的贷款分析信息。
# Project Details
For this lab you will continue using your current project src folder files created for labs 2 & 3 and you'll create the following packages & their containments in an MVC style as follows:
对于本实验,您将继续使用为实验 2 和 3 创建的当前项目 src 文件夹文件,并将以 MVC 样式创建以下程序包及其包含,如下所示:
Package:
models
FileDbConnect: will allow an object to connect / close a database connection.
将允许对象连接 / 关闭数据库连接。
FileDaoModel: where Dao stands for Data Access Object, defines CRUD (Create Read Update Delete) like operations.
Dao 代表数据访问对象,它定义 CRUD(创建读取更新删除)之类的操作。Package:
controllers
FileLoanProcessing: acts as a controller or "driver" file (i.e., includes main function) to run database CRUD methods and fires up some resulting output.
充当控制器或 “驱动程序” 文件(即包含主要功能),以运行数据库 CRUD 方法并触发一些结果输出。Package:
views
FileLoanView: shows JTable output.
显示 JTable 输出。
To start working with a database you will need a JDBC driver to allow for any connectivity within your app.
要开始使用数据库,您将需要一个 JDBC 驱动程序以允许应用程序内的任何连接。
To include a driver for your MySQL database, you need to create a folder called libs within your project root. The MySQL driver for JDBC connections packages in the form of a jar file which you can download here:
要包括 MySQL 数据库的驱动程序,您需要在项目根目录中创建一个名为 libs 的文件夹。 JDBC 连接的 MySQL 驱动程序以 jar 文件的形式打包,您可以在此处下载:
You will find a JDBC driver for connecting to a MySQL database located here:
您将在以下位置找到用于连接到 MySQL 数据库的 JDBC 驱动程序:
https://dev.mysql.com/downloads/connector/j/
Depending on your OS you will need to download a windows zip file or a tar file if you are a Mac/Linux user. I usually just choose 'Platform Independent' for Mac/Windows from the pull down menu as shown next and then choose to download the ZIP Archive version.
如果您是 Mac / Linux 用户,则根据您的操作系统,您将需要下载 Windows zip 文件或 tar 文件。 我通常只从下图所示的下拉菜单中为 Mac / Windows 选择 “Platform Independent”,然后选择下载 ZIP 存档版本。
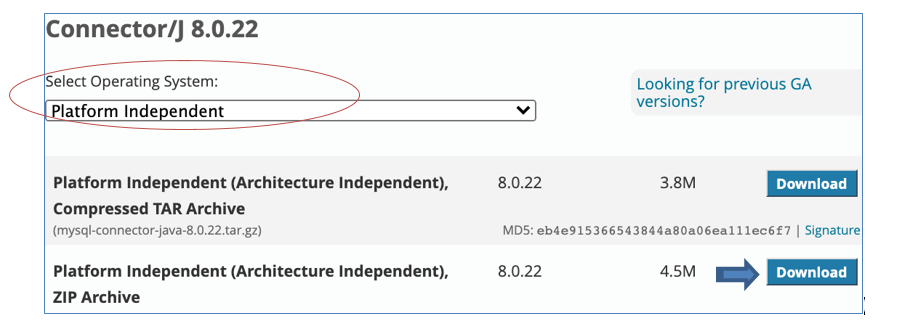
Click the download button given your choice at the right hand side, and you will be taken to a page to begin your download. Go to the bottom of the page and click on the No thanks, just start my download link . Unzip or untar the downloaded file and locate the needed and "latest" .jar file ( mysql-connector-java-8.0.22.jar ) in the unzipped foldder and copy it into your libs folder.
点击右侧给出的 “下载” 按钮,您将被带到一个页面开始下载。 转到页面底部,然后单击 “不,谢谢,只需启动我的下载链接”。 解压缩下载的文件,然后在解压缩的文件夹中找到所需的 “最新” .jar 文件(mysql-connector-java-8.0.22.jar),然后将其复制到您的 libs 文件夹中。
Next include the jar file in your Build Path, by right clicking on your project folder and then choose Build Path > Configure Build Path....
接下来,通过右键单击您的项目文件夹,将 jar 文件包含在 “构建路径” 中,然后选择 “构建路径”>“配置构建路径...”。
Once the dialog box opens make sure to click on the Libraries tab then click
对话框打开后,请确保单击 “库” 选项卡,然后单击
Add JARs…
添加 JAR ...
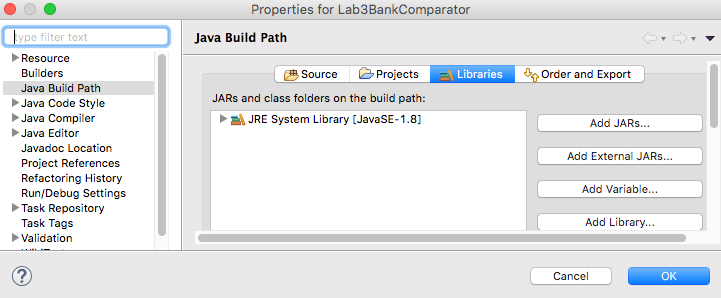
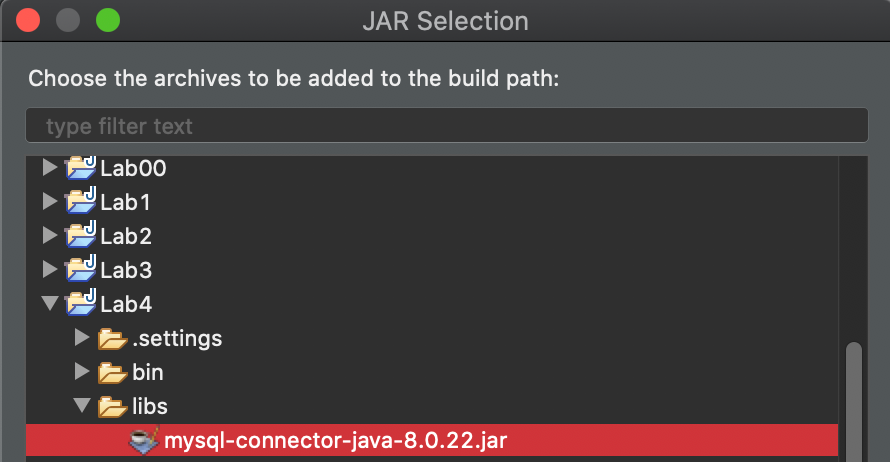
Drill down to the libs folder within your project and then choose the jar file to add.
Click OK to commit. Then click Apply and Close . Snapshot follows.
深入到项目中的 libs 文件夹,然后选择要添加的 jar 文件。
单击确定进行提交。 然后单击 “应用并关闭”。 快照如下。
# Project work
Create the following packages and corresponding files and include the helper code provided as follows (note- if some assignment statements in the spec continue to wrap to another line, you may want to adjust your source editor to include the assignment onto one line).
创建以下软件包和相应的文件,并包括如下提供的帮助程序代码(注意 - 如果规范中的某些赋值语句继续换行到另一行,则可能需要调整源代码编辑器以将赋值包括在一行中)。
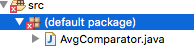
Okay for a slight workaround if necessary! IF you DO NOT have a package name for your project files thus far (i.e., it shows current as the default package), let’s go ahead and create one to make it possible for importation needs so file objects can be used! So again if your current
srcfolder shows as follows
如有必要,请稍作解决! 如果到目前为止您的项目文件都没有软件包名称(即,它将当前显示为默认软件包),那就继续创建一个可以满足导入需求的软件包,以便可以使用文件对象! 如果您当前的src文件夹显示如下
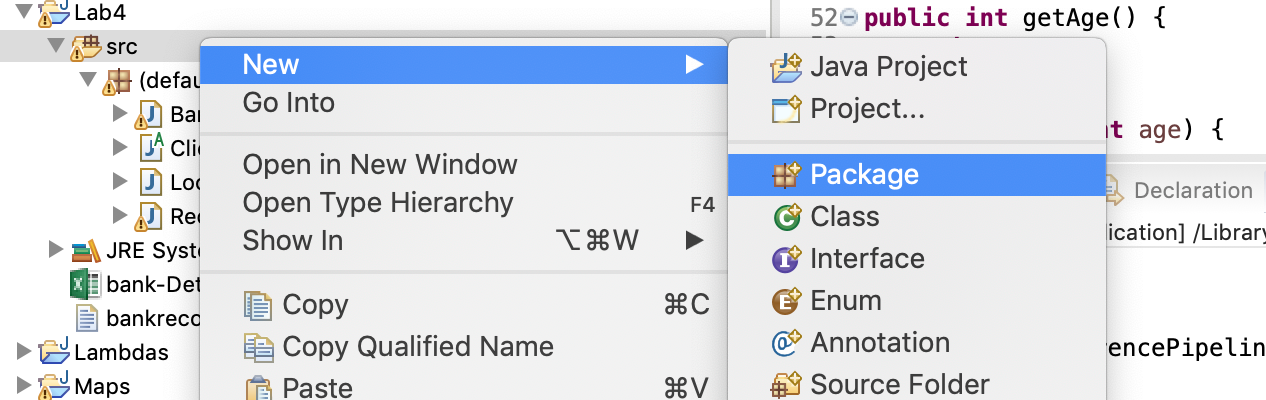
you need to create a package and move all files from your default package into your new package. To add in a new package, right click on your source folder
srcand choose New > Package. Name your packagerecords. Leave the default setting. Choose Finish to complete this step. Then highlight all your files currentlly in your default package, right click on them and choose Refactor > Move.... Click on your chosen destination (recordspackage) and press OK.
您需要创建一个程序包,并将所有文件从默认程序包移至新程序包。 要添加新包,请右键单击源文件夹(src),然后选择 New > Package。 包命名为records。 保留默认设置。 选择完成以完成此步骤。 然后在默认包中当前突出显示所有文件,右键单击它们,然后选择 Refactor > Move....。单击您选择的目标位置(records包),然后按 OK。
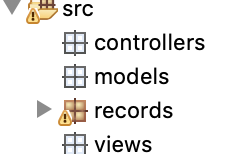
Voila, all your moved files will now havepackage records;automatically added to each file heading! Plus your default package is now blown away as shown below.
瞧,您所有移动的文件现在都将具有package records;自动添加到每个文件的标题! 另外,您的默认包现在被删除,如下所示。
Note also if you already have had a package name for your project work, you can refactor the name to
records. Keep it as files from it will automatically be imported in with other packages when time comes!
还请注意,如果您已经为项目工作使用了包名称,则可以将该名称重构为records。 保留它,因为到时文件将自动与其他软件包一起导入!
# models Package
Now to continue with your code work, right click on your source folder models and choose New > Package. Name your package models . Leave the default setting. Choose Finish to complete the step.
现在继续执行代码工作,右键单击源文件夹 models ,然后选择 New > Package。 包命名为 models 。 保留默认设置。 选择完成以完成该步骤。
Next, right click on your new package (i.e., models ) and create a class. Name your class DBConnect and copy in the following code to allow connections to the papaserver.
接下来,右键单击您的新包(即 models ),然后创建一个类。 将您的类命名为 DBConnect ,并复制以下代码以允许连接到 papaserver。
package models; | |
import java.sql.Connection; | |
import java.sql.DriverManager; | |
import java.sql.SQLException; | |
public class DBConnect { | |
// Code database URL | |
static final String DB_URL = "jdbc:mysql://www.papademas.net:3307/510labs?autoReconnect=true&useSSL=false"; | |
// Database credentials | |
static final String USER = "db510", PASS = "510"; | |
public Connection connect() throws SQLException { | |
return DriverManager.getConnection(DB_URL, USER, PASS); | |
} | |
} |
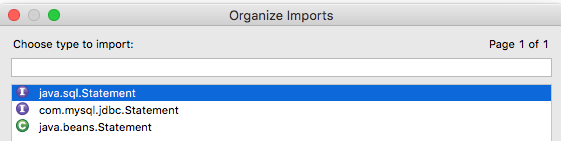
Note that any remaining helper code below will not include imports or any package names for brevity, so please make sure to add them in (Source > Organize Imports)! Note when you choose
Organize Imports, automatically any imports for any of your new packages will automatically be included as well!
请注意,以下任何剩余的帮助程序代码都将不包含导入或简短的软件包名称,因此请确保将其添加到(Source > Organize Imports)中! 请注意,当您选择Organize Imports时,也会自动包括任何新软件包的任何导入!Also note that if and when you copy code in, you may get some underlying errors, until you include any necessary import statements.
还要注意,当您复制代码时,在包含任何必要的import语句之前,可能会遇到一些潜在的错误。Also further note, when choosing imports for db operations from source classes, if you're prompted for choosing from more than one option, choose from the
java.sql, package and then the subpackage(s) in the list.
另请注意,当从源类中选择数据库操作的导入时,如果系统提示您从多个选项中进行选择,请从列表中的java.sql,包和子包中进行选择。Ex.
In the models package add in another class named DaoModel and code it as follows:
在 models 包中,添加另一个名为 DaoModel 的类,并将其编码如下:
- Include the following class fields, constructor
包括以下类字段,构造函数
//Declare DB objects | |
DBConnect conn = null; | |
Statement stmt = null; | |
// constructor | |
public DaoModel() { //create db object instance | |
conn = new DBConnect(); | |
} |
- Include a method to create a database table called
createTable.createTablemerely creates a table when the method is called. Include the fieldspid,id,incomeandpepwhen building your table setup. A PRIMARY KEY, which ensures record uniqueness is included for your build for the pid field which is shown below.
包括一种创建名为createTable的数据库表的方法。createTable仅在被调用时创建一个表。 建立表格设置时,包含字段pid,id,income和pep。 如下所示,在pid字段的构建中包含了一个PRIMARY KEY,它确保记录的唯一性。
Note when creating a table it is
IMPERATIVEto include the following name: 请注意,在创建表时,必须包括以下名称:yourFirstinitial_First4LettersOfYourLastName_tab
// CREATE TABLE METHOD | |
public void createTable() { | |
try { | |
// Open a connection | |
System.out.println("Connecting to database to create Table..."); | |
System.out.println("Connected database successfully..."); | |
// Execute create query | |
System.out.println("Creating table in given database..."); | |
stmt = conn.connect().createStatement(); | |
String sql = "CREATE TABLE yourTableName_tab " + | |
"(pid INTEGER not NULL AUTO_INCREMENT, " + | |
" id VARCHAR(10), " + | |
" income numeric(8,2), " + | |
" pep VARCHAR(3), " + | |
" PRIMARY KEY ( pid ))"; | |
stmt.executeUpdate(sql); | |
System.out.println("Created table in given database..."); | |
conn.connect().close(); //close db connection | |
}catch (SQLException se) { // Handle errors for JDBC | |
se.printStackTrace(); | |
} | |
} |
Notice carefully that
commentsare put in code as well the display of relevant information to the console. For future methods, continue this way on your own.
请注意,注释已放入代码中,并且在控制台中显示了相关信息。 对于将来的方法,请自行继续这种方式。
- Include a method to insert records called
insertRecords().
// INSERT INTO METHOD | |
public void insertRecords(BankRecords[] robjs) { | |
try { | |
// Execute a query | |
System.out.println("Inserting records into the table..."); | |
stmt = conn.connect().createStatement(); | |
String sql = null; | |
// Include all object data to the database table | |
for (int i = 0; i < robjs.length; ++i) { | |
// finish string assignment below to insert all array object data | |
// (id, income, pep) into your database table | |
sql = " "; | |
stmt.executeUpdate(sql); | |
} | |
conn.connect().close(); | |
} catch (SQLException se) { se.printStackTrace(); } | |
}// INSERT INTO METHOD |
Finish coding the above sql string with an insert statement where commented.
使用注释的 insert 语句完成对以上 sql 字符串的编码。
Example insert statement follows ( note space separation in string for statement clarity, also single vs. double quote marks! ):
下面是示例 insert 语句(为清楚起见,请注意字符串之间的空格分隔,也包括单引号和双引号!):
sql = "INSERT INTO yourTableName_tab(field 1,field 2, field n) " + | |
"VALUES (' "+value 1+" ', ' "+value 2+" ', ' "+value n+" ' )"; |
Note for brevity purposes, future starter code will mostly EXCLUDE try / catch blocks. Add in your own try / catch blocks were applicable.
为简便起见,请注意,以后的 starter code 将排除 try /catch 块。 添加您自己的 try /catch 块是适用的。
- Include a method to retrieve records for display called
retrieveRecords().
public ResultSet retrieveRecords() { | |
ResultSet rs = null; | |
stmt = conn.connect().createStatement(); | |
String sql = "SELECT * from yourTableName_tab"; | |
rs = stmt.executeQuery(sql); | |
conn.connect().close(); | |
return rs; | |
} |
# Methods breakdown
insertRecords(BankRecords [] arrayName) will allow for the array of BankRecord objects, to be passed to your method which will allow for the insertion of all the id , income and pep data from your BankRecords array (or whatever you named it) into your database table when called.insertRecords(BankRecords [] arrayName) 方法以一个 BankRecord 对象数组作为参数,将参数中的所有 id , income and pep 数据插入到数据库中。
retrieveRecords() will return a ResultSet object used for creating output. The result set contains record data including your id , income and pep table fields.retrieveRecords() 将返回用于输出的 ResultSet 对象。 结果集为包括 id , income and pep 表字段的记录数据。
Code tweak: Make sure to sort the pep field in descending order to allow for premium loan candidates to appear first in the record set for reporting purposes (i.e., those with data values of “YES”). The resultset query string to build can be something like:
代码调整:确保按降序对 pep 字段进行排序,以使保费贷款候选者在报告目的记录集中(即数据值为 “是” 的那些)首先出现。 要构建的结果集查询字符串可以类似于:
String sql = | |
"select pid, id,income, pep from yourTableName_tab order by pep desc"; |
As a quick note:
- make sure to always close out of your connections and any statements when through with any processing!
快速说明:在进行任何处理时,请确保始终关闭连接和所有语句!- Make sure to include error trapping using
SQLExceptionhandling for all your database operations and connection logic.
确保为所有数据库操作和连接逻辑包括 SQLException 处理的错误捕获。- Again, include messages to the console when your methods trigger. Ex. Table created, inserting records into database, etc.
同样,当方法触发时,将消息输出到控制台。 例如 创建表,将记录插入数据库等
A super great resource to assist you with all your JDBC-CRUD operations for your methods can be found at this site: http://www.tutorialspoint.com/jdbc/, as well as the Chapter 22 PowerPoint from Gaddis.
可以在以下站点找到一个超级有用的资源,可以为您的方法提供所有 JDBC-CRUD 操作的帮助,以及来自 Gaddis 的 Chapter 22 PowerPoint。
Remember though to phrase coding the best you can using your own object names, method naming and variable names, including coding syntax and even comments, if referencing any material from tutorialspoint, etc. so your lab work is unique.
请记住,虽然最好用短语编码,但是如果引用了 tutorialspoint 的任何材料,则可以使用自己的对象名称,方法命名和变量名称(包括编码语法甚至注释)来使用,因此您的 lab 工作是独一无二的。
# controllers Package
Next in the same manner as you created your models package, create a package called controllers and include a class called LoanProcessing for your package. Code your class file as follows.
接下来,以与创建 models 包相同的方式,创建一个名为 controllers 的程序包,包含一个名为 LoanProcessing 的类。 编写您的类文件,如下所示
For your LoanProcessing source file make sure first to extend BankRecords .
Simply follow thru with the following object creations and method calls in main .
BankRecords br = new BankRecords(); | |
br.readData(); | |
DaoModel dao = new DaoModel(); | |
dao.createTable(); | |
dao.insertRecords(robjs); // perform inserts | |
ResultSet rs; | |
rs = dao.retrieveRecords(); | |
new LoanView().runView(rs); |
Note you will error out on the
extendsclause and with theDaoModel daoopening line and thenew LoanView().runView(rs);line of code added above, until you include appropriate imports and the LoanView class which will be performed next. Go ahead and allow for yourrobjsarray to be changed to aprotectedaccess mode as well.
# Main code breakdown
Included in main() is your readData() method call which will process your BankRecord objects.main() 中调用 readData() 方法,处理 BankRecord 对象。
Then the code instantiates a DaoModel object and triggers your createTable() method, your insertRecords(your BankRecords array object) method and your retrieveRecords() method in that order.
然后,实例化一个 DaoModel 对象,并按此顺序触发 createTable() 、 insertRecords(your BankRecords array object) 和 retrieveRecords() 方法。
Of course you can comment out your createTable / insertRecords method call lines once you've accomplished that, to test how your output statements appear. Logic for that follows shortly.
当然,完成后,可以注释掉 createTable / insertRecords 方法的调用行,以测试输出语句的显示方式。 逻辑很快就会出现。
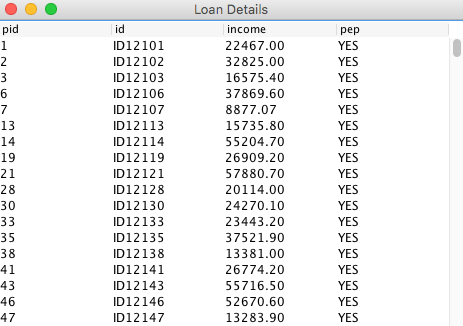
Once you have retrieved a recordset, your code will call a runView method from the LoanView class to print out all the records from the recordset, to a Java window which contains a JTable in a nice columnar format included with heading names for pid , id , income and pep and a nice title for the report!
检索到记录集后,从 LoanView 类中调用 runView 方法,以将记录集中的所有记录打印到 Java 窗口。该窗口包含一个漂亮的列格式的 JTable,其中包含标题 pid,id, income 和 pep,以及标题!
# views Package
Lastly now create a package named views and include a class called LoanView . Code LoanView's runView method as follows (make sure to include appropriate imports)
最后,创建一个名为 views 的包,并包括一个名为 LoanView 的类。编写 runView 方法(确保包含适当的导入)如下。
public void runView(ResultSet rs) { | |
// instantiate vector objects to hold column/row data for JTable | |
Vector<Vector<Object>> data = new Vector<Vector<Object>>(); | |
Vector<String> column = new Vector<String>(); | |
try { | |
ResultSetMetaData metaData = rs.getMetaData(); | |
int columns = metaData.getColumnCount(); | |
// get column names from table! | |
String cols = ""; | |
for (int i = 1; i <= columns; i++) { | |
cols = metaData.getColumnName(i); | |
column.add(cols); | |
} | |
// get row data from table! | |
while (rs.next()) { | |
Vector<Object> row = new Vector<Object>(columns); | |
for (int i = 1; i <= columns; i++) | |
row.addElement(rs.getObject(i)); | |
data.addElement(row); | |
} | |
DefaultTableModel model = new DefaultTableModel(data, column); | |
JTable table = new JTable(model); | |
JFrame frame = new JFrame("Loan Details"); | |
frame.setSize(700, 200); | |
frame.add(new JScrollPane(table)); | |
frame.setDefaultCloseOperation(0); | |
frame.pack(); | |
frame.setVisible(true); | |
rs.close(); //close ResultSet instance | |
} catch (SQLException e) { e.printStackTrace(); } | |
} |
# Code breakdown
To view the output in a nice table view, a JTable object is created to take in rows and columns (column names retrieved from generated metadata) dynamically from your ResultSet (passed through the runView method's parameter), which stores the data each as a Vector which becomes displayed in a JFrame which is part of Java's Swing API.
为了在漂亮的表格视图中查看输出,创建了一个 JTable 对象,以从 ResultSet(通过 runView 方法传递的参数)动态地获取行和列(从生成的元数据检索的列名),该数据集将每个数据存储为一个 Vector,显示在 Java 的 Swing API 的 JFrame 中。
Now before running your code from your LoanProcessing main file, go back into your LoanProcessing file and import the needed package/class name to clear your error as noted before. To finish, run your LoanProcessing source file to complete your lab work and observe your output.
现在,从 LoanProcessing 主文件运行代码之前,请回到 LoanProcessing 文件并导入所需的包 / 类名称,以清除错误(如前所述)。 最后,运行 LoanProcessing 源文件以完成实验工作并观察输出。
# Extra Credit options
- Include SQL Prepared statements when inserting records (+5 points)
插入记录时包含 SQL 预处理语句 - Show console output of Loan Analysis Report detailed data + a report title (+5 points)
显示 “贷款分析报告” 详细信息的控制台输出 + 报告标题
Or you for extra credit you may choose the following option
或者,您可以选择以下选项来获得额外的积分,
- Serialize and deserialize
BankRecordobjects using thejava.util.Mapclass. (+10 points)
使用 java.util.Map 类序列化和反序列化 BankRecord 对象。
Name your serializable filebankrecords.ser.
将您的可序列化文件命名为 bankrecords.ser。
Make your application sleep for 5 seconds between the processes.
使您的应用程序在过程之间休眠 5 秒钟。
Display to the console, the time difference between the serialization and deserialization processes.
在控制台显示,序列化、反序列化过程的时间差。
Include a zip file of all your project source code (new and old), your
.csvfile and a seperate file of your snapshots of your console at runtime which must include a table creation message, an insertion message and a snapshot of yourJTableshowing the first few rows of your record results into a Word doc file into BB for credit. Include all your source code as well into your Word doc file. If you have any extra credit, snapshot that as well and label your extra snapshot(s) accordingly. Sample displays of output follows…
# Sample run

# code
package controllers; | |
import java.io.*; | |
import java.sql.ResultSet; | |
import java.sql.SQLException; | |
import java.util.HashMap; | |
import models.DaoModel; | |
import records.BankRecords; | |
import views.LoanView; | |
public class LoanProcessing extends BankRecords { | |
private static final long serialVersionUID = 1L; | |
private static long start = 0; | |
public static void main(String[] args) throws InterruptedException { | |
BankRecords br = new BankRecords(); | |
br.readData(); | |
serialize(); | |
System.out.println("\nSleep for 5 seconds...\n"); | |
Thread.sleep(5000); | |
deserialize(); | |
DaoModel dao = new DaoModel(); | |
try { | |
dao.createTable(); | |
dao.insertRecords(robjs); | |
ResultSet rs; | |
rs = dao.retrieveRecords(); | |
System.out.println("\nCreating records table..."); | |
new LoanView().runView(rs); | |
System.out.println("Records table has been shown."); | |
} catch (SQLException e) { | |
e.printStackTrace(); | |
} | |
} | |
public static void serialize() { | |
start = System.currentTimeMillis(); | |
System.out.println("Serializing BankRecord objects..."); | |
HashMap<String, BankRecords> map = new HashMap<String, BankRecords>(); | |
//Adding elements to HashMap | |
for (int i = 0; i < robjs.length; i++) { | |
map.put(robjs[i].getId(), robjs[i]); | |
} | |
try { | |
FileOutputStream fos = new FileOutputStream("bankrecords.ser"); | |
ObjectOutputStream oos = new ObjectOutputStream(fos); | |
oos.writeObject(map); | |
oos.close(); | |
fos.close(); | |
System.out.println("Serialized data is saved in bankrecords.ser successfully."); | |
}catch(IOException e) { | |
e.printStackTrace(); | |
} | |
} | |
public static void deserialize() { | |
System.out.println("Deserializing bankrecords.ser..."); | |
try { | |
FileInputStream fis = new FileInputStream("bankrecords.ser"); | |
ObjectInputStream ois = new ObjectInputStream(fis); | |
ois.readObject(); | |
ois.close(); | |
fis.close(); | |
System.out.println("Deserialized bankrecords.ser successfully."); | |
System.out.println("\nThe time difference between the serialization and deserialization processes: " | |
+ (System.currentTimeMillis() - start) + "ms\n"); | |
} catch(IOException e) { | |
e.printStackTrace(); | |
} catch (ClassNotFoundException e) { | |
e.printStackTrace(); | |
} | |
} | |
} |
package models; | |
import java.sql.Connection; | |
import java.sql.PreparedStatement; | |
import java.sql.ResultSet; | |
import java.sql.SQLException; | |
import java.sql.Statement; | |
import records.BankRecords; | |
public class DaoModel { | |
//Declare DB objects | |
DBConnect conn = null; | |
Statement stmt = null; | |
PreparedStatement pstmt = null; | |
String table_name = "xxxx_lab4"; | |
// constructor | |
public DaoModel() { //create db object instance | |
conn = new DBConnect(); | |
} | |
// CREATE TABLE METHOD | |
public void createTable() { | |
try { | |
// Open a connection | |
System.out.println("Connecting to database to create Table..."); | |
Connection cc = conn.connect(); | |
System.out.println("Connected database successfully..."); | |
// Execute create query | |
System.out.println("\nCreating table in given database..."); | |
stmt = cc.createStatement(); | |
String sql = "CREATE TABLE " + table_name + | |
"(pid INTEGER not NULL AUTO_INCREMENT, " + | |
" id VARCHAR(10), " + | |
" income numeric(8,2), " + | |
" pep VARCHAR(3), " + | |
" PRIMARY KEY ( pid ), UNIQUE( id ))"; | |
stmt.executeUpdate(sql); | |
System.out.println("Created table in given database..."); | |
conn.connect().close(); //close db connection | |
} catch (SQLException se) { // Handle errors for JDBC | |
if(se.getErrorCode() == 1050) | |
System.out.println("Created table in given database..."); | |
else | |
se.printStackTrace(); | |
} | |
} | |
// INSERT INTO METHOD | |
public void insertRecords(BankRecords[] robjs) throws SQLException { | |
Connection cc = conn.connect(); | |
cc.setAutoCommit(false); | |
try { | |
// Execute a query | |
System.out.println("\nInserting records into the table..."); | |
String sql = "INSERT INTO " + table_name + "(id, income, pep) VALUES (?, ?, ?) ON DUPLICATE KEY UPDATE income=income"; | |
pstmt = conn.connect().prepareStatement(sql); | |
// Include all object data to the database table | |
for (int i = 0; i < robjs.length; ++i) { | |
// finish string assignment below to insert all array object data | |
// (id, income, pep) into your database table | |
pstmt.setString(1, robjs[i].getId()); | |
pstmt.setDouble(2, robjs[i].getIncome()); | |
pstmt.setString(3, robjs[i].getPep()); | |
pstmt.addBatch(); | |
} | |
int[] arr = pstmt.executeBatch(); | |
cc.commit(); | |
System.out.println(arr.length + " Records inserted!"); | |
pstmt.close(); | |
cc.close(); //close db connection | |
} catch (SQLException se) { // Handle errors for JDBC | |
cc.rollback(); | |
se.printStackTrace(); | |
} | |
} | |
public ResultSet retrieveRecords() { | |
ResultSet rs = null; | |
try { | |
System.out.println("\nQuerying records from the database..."); | |
stmt = conn.connect().createStatement(); | |
String sql = "SELECT pid, id, income, pep from " + table_name + " order by pep desc"; | |
rs = stmt.executeQuery(sql); | |
conn.connect().close(); | |
} catch (SQLException se) { | |
se.printStackTrace(); | |
} | |
return rs; | |
} | |
} |
package models; | |
import java.sql.Connection; | |
import java.sql.DriverManager; | |
import java.sql.SQLException; | |
public class DBConnect { | |
// Code database URL | |
static final String DB_URL = "jdbc:mysql://www.xxxxx.net:3307/510labs?autoReconnect=true&useSSL=false&rewriteBatchedStatements=true"; | |
// Database credentials | |
static final String USER = "db", PASS = "1213"; | |
public Connection connect() throws SQLException { | |
return DriverManager.getConnection(DB_URL, USER, PASS); | |
} | |
} |
package records; | |
import java.io.BufferedReader; | |
import java.io.File; | |
import java.io.FileReader; | |
import java.io.Serializable; | |
import java.util.ArrayList; | |
import java.util.Arrays; | |
import java.util.List; | |
public class BankRecords extends Client implements Serializable { | |
//setup static objects for IO processing | |
private static final long serialVersionUID = 1L; | |
//array of BankRecords objects | |
protected static BankRecords robjs[] = new BankRecords[600]; | |
//arraylist to hold spreadsheet rows & columns | |
static ArrayList<List<String>> array = new ArrayList<>(); | |
//instance fields | |
private String id; | |
private int age; | |
private String sex; | |
private String region; | |
private double income; | |
private String married; | |
private int children; | |
private String car; | |
private String save_act; | |
private String current_act; | |
private String mortgage; | |
private String pep; | |
@Override | |
public void readData() { | |
BufferedReader br = null; | |
//initialize reader object and set file path to root of project | |
try { | |
br = new BufferedReader(new FileReader (new File("bank-Detail.csv"))); | |
String line; | |
//read each record in csv file | |
while ((line = br.readLine()) != null) { | |
//parse each record in csv file by a comma ( , ) | |
//into a list stored in the arraylist-> Arrays | |
array.add(Arrays.asList(line.split(","))); | |
} | |
} catch (Exception e) { | |
System.err.println("There was a problem loading the file"); | |
} | |
processData(); //call function for processing record data | |
} | |
@Override | |
public void processData() { | |
//create index for array while iterating thru arraylist | |
int idx=0; | |
//create for each loop to cycle thru arraylist of values | |
//and PASS that data into your record objects' setters | |
for (List<String> rowData: array) { | |
//initialize array of objects | |
robjs[idx] = new BankRecords(); | |
//call setters below and populate them, item by item | |
robjs[idx].setId(rowData.get(0)); //get 1st column | |
robjs[idx].setAge(Integer.parseInt(rowData.get(1))); //get 2nd column | |
robjs[idx].setSex(rowData.get(2)); | |
robjs[idx].setRegion(rowData.get(3)); | |
robjs[idx].setIncome(Double.parseDouble(rowData.get(4))); | |
robjs[idx].setMarried(rowData.get(5)); | |
robjs[idx].setChildren(Integer.parseInt(rowData.get(6))); | |
robjs[idx].setCar(rowData.get(7)); | |
robjs[idx].setSave_act(rowData.get(8)); | |
robjs[idx].setCurrent_act(rowData.get(9)); | |
robjs[idx].setMortgage(rowData.get(10)); | |
robjs[idx].setPep(rowData.get(11)); | |
/*continue processing arraylist item values into each array object -> robjs[] by index*/ | |
idx++; | |
} | |
//printData(); //call function to print objects held in memory | |
} | |
@Override | |
public void printData() { | |
//1. Set appropriate headings for displaying first 25 records | |
//2. Create for loop and print each record objects instance data | |
//3. Within for loop use appropriate formatting techniques to print out record detail | |
//Set heading | |
System.out.printf("First 25 Client details:\n\n%-10s\t%-10s\t%-10s\t%-10s\t%-10s\t%-10s\n", "ID","Age","Sex","Region","Income","Mortgage"); | |
for (int i=0;i<25;i++){ | |
String s=String.format("%-10s\t%-10d\t%-10s\t%-10s\t%-10.2f\t%-10s", | |
robjs[i].getId(),robjs[i].getAge(),robjs[i].getSex(),robjs[i].getRegion(),robjs[i].getIncome(),robjs[i].getMortgage()); | |
System.out.println(s); | |
} | |
} | |
/** | |
* @return the id | |
*/ | |
public String getId() { | |
return id; | |
} | |
/** | |
* @param id the id to set | |
*/ | |
public void setId(String id) { | |
this.id = id; | |
} | |
/** | |
* @return the age | |
*/ | |
public int getAge() { | |
return age; | |
} | |
/** | |
* @param age the age to set | |
*/ | |
public void setAge(int age) { | |
this.age = age; | |
} | |
/** | |
* @return the sex | |
*/ | |
public String getSex() { | |
return sex; | |
} | |
/** | |
* @param sex the sex to set | |
*/ | |
public void setSex(String sex) { | |
this.sex = sex; | |
} | |
/** | |
* @return the region | |
*/ | |
public String getRegion() { | |
return region; | |
} | |
/** | |
* @param region the region to set | |
*/ | |
public void setRegion(String region) { | |
this.region = region; | |
} | |
/** | |
* @return the income | |
*/ | |
public double getIncome() { | |
return income; | |
} | |
/** | |
* @param income the income to set | |
*/ | |
public void setIncome(double income) { | |
this.income = income; | |
} | |
/** | |
* @return the married | |
*/ | |
public String getMarried() { | |
return married; | |
} | |
/** | |
* @param married the married to set | |
*/ | |
public void setMarried(String married) { | |
this.married = married; | |
} | |
/** | |
* @return the children | |
*/ | |
public int getChildren() { | |
return children; | |
} | |
/** | |
* @param children the children to set | |
*/ | |
public void setChildren(int children) { | |
this.children = children; | |
} | |
/** | |
* @return the car | |
*/ | |
public String getCar() { | |
return car; | |
} | |
/** | |
* @param car the car to set | |
*/ | |
public void setCar(String car) { | |
this.car = car; | |
} | |
/** | |
* @return the save_act | |
*/ | |
public String getSave_act() { | |
return save_act; | |
} | |
/** | |
* @param save_act the save_act to set | |
*/ | |
public void setSave_act(String save_act) { | |
this.save_act = save_act; | |
} | |
/** | |
* @return the current_act | |
*/ | |
public String getCurrent_act() { | |
return current_act; | |
} | |
/** | |
* @param current_act the current_act to set | |
*/ | |
public void setCurrent_act(String current_act) { | |
this.current_act = current_act; | |
} | |
/** | |
* @return the mortgage | |
*/ | |
public String getMortgage() { | |
return mortgage; | |
} | |
/** | |
* @param mortgage the mortgage to set | |
*/ | |
public void setMortgage(String mortgage) { | |
this.mortgage = mortgage; | |
} | |
/** | |
* @return the pep | |
*/ | |
public String getPep() { | |
return pep; | |
} | |
/** | |
* @param pep the pep to set | |
*/ | |
public void setPep(String pep) { | |
this.pep = pep; | |
} | |
} |
package records; | |
public abstract class Client { | |
public abstract void readData(); //read file detail | |
public abstract void processData(); //process file detail | |
public abstract void printData(); //print file detail | |
} |
package views; | |
import java.sql.ResultSet; | |
import java.sql.ResultSetMetaData; | |
import java.sql.SQLException; | |
import java.util.Vector; | |
import javax.swing.JFrame; | |
import javax.swing.JScrollPane; | |
import javax.swing.JTable; | |
import javax.swing.table.DefaultTableModel; | |
public class LoanView { | |
public void runView(ResultSet rs) { | |
// instantiate vector objects to hold column/row data for JTable | |
Vector<Vector<Object>> data = new Vector<Vector<Object>>(); | |
Vector<String> column = new Vector<String>(); | |
try { | |
ResultSetMetaData metaData = rs.getMetaData(); | |
int columns = metaData.getColumnCount(); | |
// get column names from table! | |
String cols = ""; | |
for (int i = 1; i <= columns; i++) { | |
cols = metaData.getColumnName(i); | |
column.add(cols); | |
} | |
// get row data from table! | |
while (rs.next()) { | |
Vector<Object> row = new Vector<Object>(columns); | |
for (int i = 1; i <= columns; i++) | |
row.addElement(rs.getObject(i)); | |
data.addElement(row); | |
} | |
DefaultTableModel model = new DefaultTableModel(data, column); | |
JTable table = new JTable(model); | |
JFrame frame = new JFrame("Loan Details"); | |
frame.setSize(700, 200); | |
frame.add(new JScrollPane(table)); | |
frame.setDefaultCloseOperation(0); | |
frame.pack(); | |
frame.setVisible(true); | |
rs.close(); //close ResultSet instance | |
} catch (SQLException e) { | |
e.printStackTrace(); | |
} | |
} | |
} |